We all receive a mountain of emails each day. At times, it can seem daunting to even the most diligent respondents. In many cases, that sense of email being “overwhelming” is due to messages being completely unclassified when they arrive, requiring you to not just read emails but also to sort them. Wouldn’t it be easier if some of this filing happened automatically?
With Microsoft Outlook (part of Microsoft 365), you have the tool you need to bring order to your inbox! This tool can go deep, but even if you just scratch the surface you can start saving yourself time each day.
Creating Rules in Outlook
Finding the rules configuration is slightly different depending on whether you are using the web interface of Outlook or the desktop application.
Finding Rules Settings on the Outlook Web App
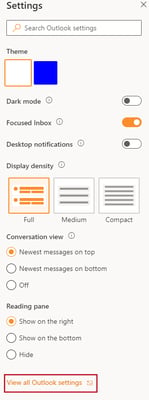
First, click the gear in the upper right corner of the screen while in your mailbox.

Next, click the View All Outlook Settings link at the bottom of the menu that appears.
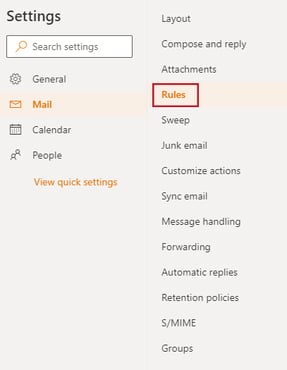
In the menu that appears, click Rules from the options under the Mail category.
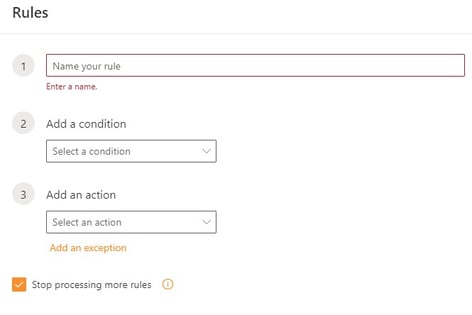
You will then see any rules that are in place already (if applicable to you), and a link at the top to create a new rule. Click Add New Rule to start creating your rule. The screen below will appear.
If you click into the conditions and actions, you can see that your options are numerous. How you choose to use Rules is, of course, up to your personal preferences and workflows.
Finding Rules Settings in the Outlook Desktop Application
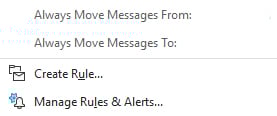
In the desktop application, the Rules option appears by default in your Home ribbon.

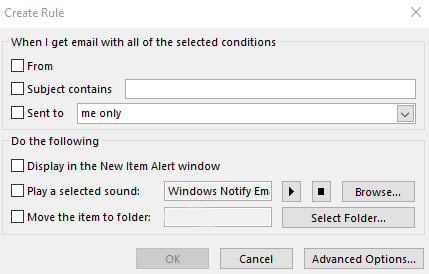
In the menu that comes up, you will see a few contextual suggestions of rules you might want to create based on the message you have selected and the option to either Create Rule … or Manage Rules & Alerts …
When you choose to create a rule, you will be presented with a simple creation screen based on the message you have selected. If you need additional options beyond these, click the Advanced Options … button to see all the ways you can configure the rule.
Example of a Rule Created in the Web App
To explain how the process works, I’ll go through an example of a common use case: filing automated messages to a specific folder for easy reference. I'll be using the web app here, but the process is very similar in the desktop application.
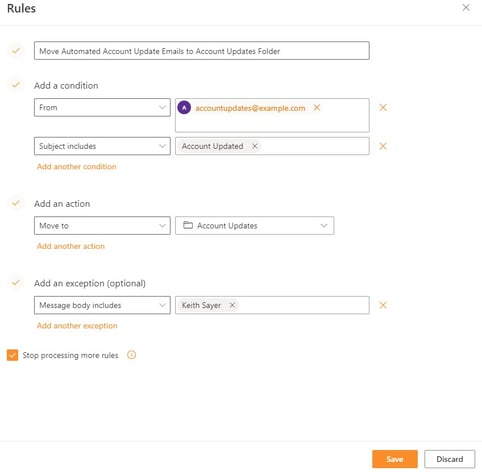
- The first step is to name your rule. You can name it anything you like, but I recommend a name that makes clear what the rule does. I will name my example: Move Automated Account Update Emails to Account Updates Folder.
- Next, I need to define what conditions will cause this rule to trigger. In this case, let’s imagine that all these emails come from the address accountupdates@example.com. All I have to do is select the condition type From from the dropdown and add the email address to the text field to the right.
- Let’s say, though, that other types of messages might come from this email address. In that case, I need to make my conditions more specific. Often automated messages have a consistent format in the subject line, so I can use that to more precisely define the message I want to sort. In my example, all account update emails include the words Account Updated in the subject line. So I select the condition type “Subject includes” and type out Account Updated in the text field.
- Next, I need to define what happens when the rule triggers. There are many options, but the simplest one for most situations is to simply use the Move to type and select the appropriate folder you want messages filed to. In this case, I’ve defined the folder as “Account Updates.”
- Finally, you can define any exceptions that will prevent the rule from firing. In my example, I want any account updates that relate accounts I own to not be filed immediately. I know that every automated message includes the owner’s name in the body, so under Add an exception, I select the Message body includes type and add my name in the text field. This will keep my account updates in my main inbox until I review them.
- The Stop processing more rules option is generally a good idea unless you know that you will want to do something else with these same messages. I don’t want that to happen in this case, so to keep things clean, I check this box.
Here’s how that looks all together.
Click Save and you are done! This rule appears in the list of rules so you can edit it or delete it as you see fit.
This process is the same in the desktop application, the interface just looks a little different, and it pulls in contextual suggestions based on the message you have selected.
If you found this Outlook guide helpful, I recommend reading my previous blog on how Quick Parts can help you respond more quickly to emails by reducing the number of times you have to re-type a common response.